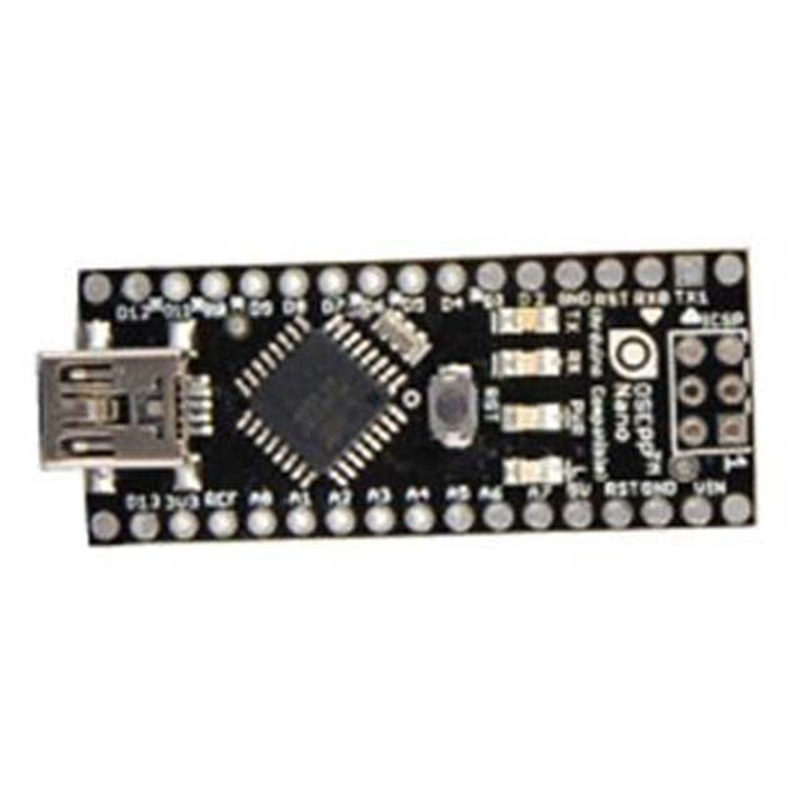
The OSEPP Nano is a breadboardfriendly downsized version of the Uno board with much of the same functionality. The main workhorse is still the ATmega328P; however the number of analog pins has gone up from four to eight. The other difference is the lack of a DC power connector. Highlights:
- 8bit AVR RISCbased microcontroller running at 16 MHz Single miniUSB connector for both power and serial communication Form factor is breadboard friendly Less than 1/3 the size of the OSEPP Uno Two extra analog input pins compared to the OSEPP Uno
- Compatible with existing Arduino software librariesFeatures:The ATmega328P comes with the Arduino bootloader preloaded.
- There are ICSP (InCircuit Serial Programming) pinouts for the ATmega328 that can be used in conjunction with a header (sold separately) to optionally replace the bootloader.
- The input or output pins can easily be brought out by soldering 0.100inheaders to the pads. The board was designed to easily fit breadboards with the headers soldered on.
Specs:
- Microcontroller ATmega328P
- Clock Speed 16 MHz
- Flash Memory 32 KB
- SRAM 2 KBEEPROM 1 KB
- Operating Voltage 5V
- Input Voltage 612 V
- Digital I/O Pin Count 14 (including 6 for PWM output)
- Analog Input Pin Count 8
- Other Connections MiniUSBSerial communication (requires header)
- ICSP (requires header)
- Dimensions 1.73 x 0.71 x 0.31 inches (44.0 x 18.0 x 8.0 mm)
- Power Source MiniUSB
Learning Center:
Uploading Your First Sketch
- Get the Arduino software if you have not already
- Download fromhttp://arduino.cc/en/Main/Software
- Unzip the zip file to somewhere like C: (on Windows) so you will end up with a folder like C:arduino0022
- Prepare for serial communication
- Connect the USBB end of the cable into the board
- Connect the other end of the cable into a USB port on your PC/Mac
- If your computer prompts for drivers point it to the driversFTDI USB Drivers subfolder of the Arduino software e.g. C:arduino0022driversFTDI USB Drivers
- You should now see the LED labeled ON near the reset button light up
- Load the sketch
- Open the Arduino software
- Open the LED blink sketch: File menu > Examples > Basics > Blink
- Select the Arduino Nano: Tools > Board > Arduino Nano
- Select the serial port: Tools > Serial Port. This is the serial port for the boards builtin FTDI. If you do not know which one this is you can find out by going into Device Manager > Ports (COM & LPT) and look for a USB Serial Port (COMx)
- Upload the sketch: File > Upload to I/O Board
- Wait for the Done uploading message in the bottom blue status bar
- The LED labeled L near pin 13 should now blink slowly
- Congratulations! You have successfully uploaded your first sketch to your board.
Reviews
There are no reviews yet.